Showing posts with label EOTD. Show all posts

TODAY'S FACE #1

Monday, 26 January 2015

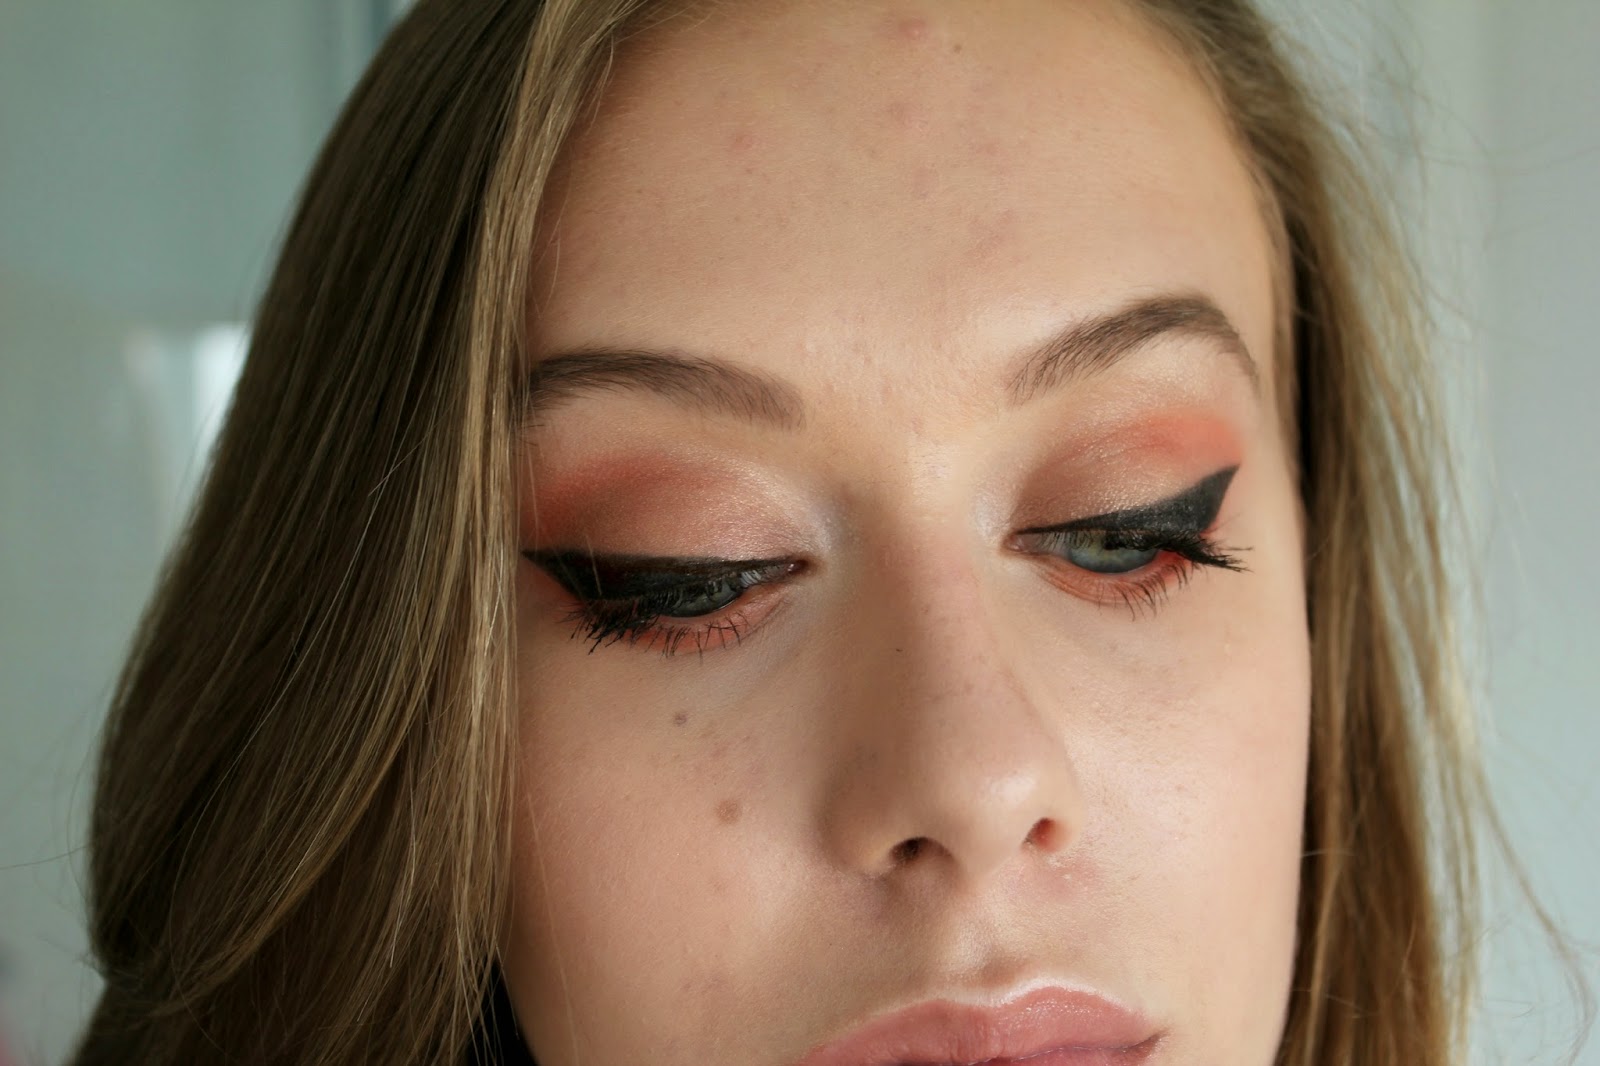
Smashbox Undereye Primer // Bourjois Luminous Primer // Bourjois Healthy Mix Serum // Elf Pebble Eyeshadow // Soap and Glory Archery Pencil // Avon Eye Primer // Rimmel Scandaleyes Liquid Shadow Paint (Golden Bronze) // Urban Decay Half Baked & Tease // NYC Sunny Bronzer (in the crease) // Milani Eye Tech Liner // Benefit They're Real // Bobbi Brown Tinted Eye Brightener // Collection Lasting Perfection // Rimmel Stay Matte Powder // Nars Laguna // Sleek Contour Kit // Benefit High Beam // Rimmel Kate Lipstick (16)

So I don't tend to do these 'face of the day/FOTD' posts regularly here, but I thought after seeing Megan post some stunning looks I would go for it myself. I did my makeup at the weekend as I went along with no plan of what I wanted to see, but I got this golden bronze eyes, bronzed skin, peachy coral lips look which I really love and I think it'll be one I'll look back in the archives for when summer comes around. 

If you would like to see this more regularly do let me know and I will sort out a schedule or something because I really enjoyed photographing this look!


FIVE PIECE FOOLPROOF EYES

Wednesday, 14 January 2015


Over the Christmas break, I totally stripped back my eye makeup (getting up early on boxing day wasn't going to be a full on smokey eye look, was it?) and it's kind of stuck for school and such, and only involves 5 products, including tools.

For brows I was quickly etching them in with the Soap&Glory Archery Brow Pencil and Tint, a product I used to be sacred of for the fear of cartoon looking brows, but I've found the good light handed technique that leaves them looking the same as if I were to have used a shadow.

Speaking of shadow, I was using the MAC Malt matte eyeshadow all over the lid; it's a light taupe-pink sort of nude and just looks very barely there and natural, but still like you've got something on your lids. I just use the Real Techniques Base Shadow brush for this, as it applies colour and blends too, and sometimes I will take a bit of my bronzer of the day to define the crease slightly more.

Then, as it seems I can't go a day without a slick of liner any more, I use the Benefit They're Real Push Up Liner - one that took a bit of getting used to but with the right technique you can get an ultra black gel feline flick that balances nicely with the light sweep of shadow. Then, a few coats of They're Real Mascara seals everything together and gives me length and volume to the lashes.

What has your daily eye makeup routine been recently?

EXPERIMENTAL EYES #2 - PINK AND GOLD

Saturday, 9 August 2014

You might remember my first installment of 'experimental eyes' and today I'm here with part two, which is a bit more wearable and is a soft, almost quite romantic pink and gold look. I will add that my brows were not looking on point on the day and I can't help but gawp at them instead of focusing on the shadow, so apologies.

I started by using the Avon Eye Primer as per usual, and then took Shade 2 from the MUA Undressed Palette (a budget friendly look today) on the inner half of the lid to create a slightly pink sheen. Shade 4 (a pale brown/taupe shimmer) went over the rest of the lid with Shade 6 (quite comparable to Half Baked by Urban Decay) in the centre of the lid to add that golden sheen.

For the pink crease I began with Shade 5 as a warm matte brown base, and then took Crochet from the Sleek Lace Blush By Three, along with the pink from the H&M Spring Flowers Blush to transition it as it was a bit lighter in colour. I don't own any pink shadows so it's all about working with the products you own whether that be blushes, bronzers or something else. As usual I blended the outer edge with a touch of the Sleek Contour colour to give it a warm, seamless look and is pretty much foolproof.

I used the Barry M Blink Pen Liner to create a wing slightly less dramatic than shown in the previous look, but still fairly noticeable. I also used the same array of mascaras as the previous look, Soap and Glory Thick & Fast, followed by Sheercover Lash Fibres, then Too Faced Lashgasm - a bit of a creature of habit it seems (or maybe not considering I just put pink on my eyes). 

EXPERIMENTAL EYES #1 - POP OF ORANGE

Friday, 1 August 2014


 Now Summer is here, I thought it'd be a good time to start being more experimental with my eye makeup and add in some colour. I always try purples and blues with little success and never really contemplated orange-coral colours until I saw 2 colours from my Sleek Blush By 3 in Lace that I thought could make an interesting eye look... and I really love the result. 

I used quite a large variety of products within the process so I'll try and keep this short and sweet. The Avon Eye Primer was the first step to blank out the lids and avoid creasing, followed by a coat of the Dainty Doll Cream Blush in Billion Dollar Babies (is it cheek products for eye shadow day today?!), as well as the MUA Colour Blast Shadow Stick in Stay all over the lid, with the Stila Smudge Stick in Oscar Fish blended into the outside corners. I then took the contour colour from the Sleek Face Form through the crease to warm things up as well as putting Half Baked from Urban Decay in the centre of the lids.

On the lower lashline I put the Stila Smudge Stick in Angelfish, followed by Chantilly from the Sleek Blush By 3 (also pushed into the waterline) as well as Crochet on the outer half. I did this with a small dense tapered brush to really pack on the colour and used the same technique to focus this bright colour on the outer crease. I took the brush I used for the contour colour very lightly to blend the edges.

The liner is a mix of the Maybelline Colour Tattoo in Blackest Black and Barry M's Blink Waterproof Pen. On my lashes is a coat of Soap and Glory Thick & Fast followed by the Sheercover Lash Fibres and then Too Faced Lash Gasm Mascara on top of them.

I said I wouldn't ramble but would you look at that... I did. With simple glowy skin and a nude pout I predict this look will be getting a lot more wear from me in the upcoming weeks. Also, watch this space, this morning I photographed a pink and gold look for you so maybe this can become a mini 'experimental eyes' series?

THE EYE PRIMER PARTY

Tuesday, 18 March 2014


As much as I don't get along with many face primers, not a day goes by without me using an eye primer. No-one likes a creased eye look, nor a liner wing that's halfway down the lashline.I have 4 in my collection, all of which I find work for different things.

My favourite of the bunch is the Avon Eye Shadow Primer in Light Beige which is slightly tinted so it colour corrects the eye and mattifies (without drying whatsoever) the entire lid and preps it for anything you are putting on top - shadow, cream products, or just liner. It's great.

The next offering is the MUA Pro Base Eye Primer, which was actually my very first post on this blog. I raved about it then, and although this is still great and extremely budget based, I feel like the Avon one just beats it for me. But, this one still does the job well and if I didn't have the Avon one in my life I would still be using this daily.

When I am doing a dramatic eye, or anything involving a touch of colour, I reach for the Dainty Doll Frankie Girl Eye Base as it is so pale that it totally blanks out the lid with a creamy coloured layer, which makes any colour stand out more and mattifies so there is no creasing.

Finally, the Smashbox Photo Finish Lid Primer (mini) has been in my collection for a short while now. I did rave about this originally, but the last time I used this I had a bit of creasing going on. I'm hoping it was a one off because I really liked this one beforehand.

What are your favourite eye primers?

A BELATED AUTUMNAL SMOKEY

Friday, 31 January 2014


There are a number of bandwagons in the blogging world - most of which I jump onto a good few months late, including the red/burgundy autumnal smokey eye, but I thought it deserves a post anyway.

You are probably all screaming at your screens waiting for me to quit the rambling and get on with explaining what products I used, so I'll do it now. I began by priming the lid with the Smashbox Photo Finish Lid Primer, which is my new favourite primer, and I followed that up with MAC Bare Study Paint Pot all over the lid. I used my trusty MUA Undressed Palette and used Shade 2 all over the lid, followed by Shade 9 on the outer half and along the lower lashline. I then took the Kiko Eyeshadow in 137 through the crease and blended it thoroughly and then went in with 133 to deepen it up slightly.
Finally, I finished off with Soap and Glory Thick & Fast Mascara and the look was complete.

I may be late on this, but I will continue to go for the winter looks until I see a ray of sunshine through the clouds and I personally declare it Spring.


BARRY M BLINK EYELINER

Friday, 6 December 2013


Diverting away from the Christmas posts for a day, over the past month or two this Barry M Blink Eyeliner has quickly become my favourite eyeliner. I haven't tried many before, but the simplicity of using this has won me over.

This is a felt tip eyeliner, which I find the easiest type of liner to use. I basically draw on whatever shape I like, whether that is a dramatic wing, a small wing, or no wing at all, (some of which are demonstrated in the picture above), and it will last all day. I love that the pen tip is a spongey-foam kind of thing, as it just makes the application so much more flexible and quick. 


This is waterproof and smudgeproof, and all the other good stuff. I have only ever had this smudge on me once when my eye watered and I went crazy rubbing my eye because I forgot I had eyeliner on. School Girl Error. For £4.19 though, and for how blimmin' good this is, I will be repurchasing to my heart's content. 


If you suck at eyeliner, go and buy this. I was awful at liner, and after buying this, the amount of compliments I have gained isn't countable on my two hands...


Follow on Bloglovin

Winged Out EOTD

Saturday, 25 May 2013

Hi guys!
So, I may sound a little overexcited in this post, as I am very hyper after just managing to pick up my own pair of disco pants from Primark! Eeep! So, yeah. That happened.
 I will be doing some upcoming posts on ways I wear my disco pants, and also I may be doing a comparison between Topshop ones (belonging to Megan) and my Primark ones at some point.
Onto todays post.
I have always been a fail at applying winged liner, because I don't have a proper eyeliner that works. I saw on a youtube video that you could use some mascara and an angled brush to create the wing, and thats what I did!
For my brows, I used Tease from the Urban Decay Naked 2 palette. For the liner, I used Blackout from the same palette, and then went over it with and angled brush and Maybelline the Falsies Waterproof. On the waterline I used a Bourjois Smokey Effet liner in Sparkling Granite, which is a navy glittery liner, but the glitter doesn't show too much. I also used some of the Avon Glimmerstick in Blackest Black over it to deepen it up. For actual mascara, I used the Sheer Cover Extra Length Mascara in Black/Brown, which I find does an AMAZING job of adding length.
As a base, I used the MUA Pro Base Eye Primer, which I love. Then for my base colour I used Bootycall from the UD Naked 2 palette, and then I used a teeny tiny amount of Suspect on the outer third. I then worked a small amount of Tease into the crease, to add slight dimension. To line the lower lashline, I used Half Baked - a strong gold shimmer, which I thought completed the entire look. I saw on a post Megan did, which invlolved gold on the lower lashline, and I am now obsessed with it myself.
So, thats all for todays post... well, there was actually quite a lot there if I am honest!
What eye products have you been loving recently?
Thanks for reading,
Bye!

Maybelline The Falsies Review (Before+After) and EOTD

Thursday, 14 March 2013

Hi everyone!
This mascara was purchased a while ago and I never reviewed it, so I thought now I would do it as I liked my eye makeup so I thought it would be a perfect opportunity! To see the EOTD, scroll down!
I like waterproof mascaras, so that is what this one is. It has a spoon wand with actual bristles, which normally I don't like, but I find this one curls and grips the lashes perfectly.
Mascara Product Shot. £8.99 Boots and Superdrug
Before the mascara:

Eye with no mascara.
After the mascara:
After the mascara. The top lashes actually look more lengthened in real life.
 
 
So the EOTD:
EOTD - products listed below. BROWS - Urban Decay Naked 2 (Tease)
So I started by using Bootycall from the Urban Decay Naked 2 palette as a highlight colour. I then used the light colour from the NYC Duo in Eastside Brownstone, which I love, and sweeped that all over the lid. I took the darker colour on the outer third of the lid.
Over that I then applied some of the Rimmel GlamEyes Shadow in Backstage. Then In put a small amount of Tease from the Naked 2 into the crease, and then over that to deepen it slightly I went in with ELF Pebble, and then finally some of Blackout from the Naked 2 (just the smallest amount) and that just made the look a little more smokey.
 
I hope you have enjoyed this first EOTD of mine. Let me know your holy grail eyeshadow products!
Don't forget to comment and follow. Thanks for reading!
Lauren x
Proudly designed by | mlekoshiPlayground |